Quantcast
Channel: QVC : Community : Blogs
Viewing all 3342 articles
Browse latest View live

Live in the Sunshine, Swim the Sea, & Drink the Wild Air

$
0
0

Hi my friends, I hope you don’t mind but before you head off on your summer vacation, I’ve planned a last minute trip for each of us. So pack your bags and please make sure to bring your bathing suit and plenty of sunblock because we are headed over to the beautiful Andaman Sea.

Exploring the beautiful waters of the Andaman Sea


Long fabled amongst travelers for its legendary beaches, remote location, world-class diving, & emerald green & blue waters, the Andaman Sea takes even the most experienced explorers breath away upon arrival.

I find the tranquility & the peace you experience when ‘Free Diving’ to be so calming to the soul.


Located to the west of Thailand, the Andaman Sea is home to close to 300 islands with only a dozen open to tourist. This modern day paradise with spectacular jungles has not only been the destination for Hollywood films but is home to one of the last Nomadic tribes in the world.

I’ve explored many remote villages around the world who live independently from today’s modern lifestyle, but I had never met a tribe of ‘Sea Gypsies’ like the people of the Molken Village.


Last year I was lucky enough to spend a week exploring not only the picturesque islands of the Andaman Sea, but also the stunning waters that surround them. Under the expertise of a local guide, I learned about the rich history of these islands and the ‘sea gypsies’ who inhabit them. I also had the opportunity to go ‘free diving’ into some of the most pristine waters I’ve ever experienced.

There is nothing like the angelic faces of children, no matter where I travel, they have the biggest impact on my experience.


I quite often see the face of my own daughter Olive in the faces of the children I meet during my explorations.


I knew this trip would be the inspiration for our next JAI Collection after the very first day of exploring these beautiful waters. It truly is a magical place, whether I was exploring its lush jungles or experiencing the diverse and exotic marine life, inspiration was around every corner

I spent hours each day under the sea, exploring every nook and crevice of each coral shelf I came upon. New marine life greeted me with each blink of my eyes.


I saw some of the most beautiful living art that I’ve ever experienced while exploring these untouched waterways.


Throughout our history, water has come to symbolize many things to many people around the world. Whether in works of faith, art, or legendary tales, the relationship between man and water is as important today as it was at the beginning of time.

Traveling throughout Asia I’ve always been drawn to the legend of the Koi fish and decided to do our own interpretation as the first figurative design within the Andaman Sea Collection.


I chose blue topaz as the color of the eyes of the Koi designs to reflect the crystal blue waters of the sea.


My time exploring all the wonders of the Andaman Sea helped me better understand the universal symbols of the ocean: purity, freedom, courage, and empowerment.

I love mixture of leather and silver. The two Koi fish intertwined is a symbol of good fortune, happiness, and harmony.


I’m excited to bring these inspirations and experiences to life for you in our newest JAI collection, the Andaman Sea, which will debut this Saturday, May 23rd at 9pm ET with my friend Jill Bauer. Please join me for an hour of beautiful new designs and all the inspirations behind them. If you are a morning person, then please join me at 5am that Saturday morning with a cup of coffee for an hour of your favorite JAI designs with Stacey Stauffer.

Safe Travels /\ Scott


FB: JAI Jewelry for QVC ; Instagram: JAIJewerly_

I’m also excited to share with you more new designs within our Sukhothai Collection and our Croco Collection. This new double headed croco cuff was one of the most requested new designs that I received from you.


The Peace of a Piece of Quiche

$
0
0

I know quiche is a classic dish, but for me it also serves as a nostalgic trip back to the 1980s, when I was a teenager. There was a restaurant at our mall (of all places) that served what I recall as a perfect version, and I felt very sophisticated going there to have it for lunch. There were mall restaurants specializing in crepes back then, too. No wonder I ended up minoring in French!

Somewhere along the way, it seems that quiche kind of fell off my radar. I’ve actually made it a few times over the years, but none of them measured up to the one in my memory. Lately, I’d been having a serious craving for a truly great quiche, so I was determined to try again.

I spent some time brainstorming a way to get my kids on board, too, and settled on finding a recipe that uses bacon and cheddar cheese instead of the ham and gruyere cheese I’d used in past attempts. When my search turned up these ingredients in a recipe from Ree Drummond of The Pioneer Woman Cooks, I knew it was the one for me. I’ve found her recipes to be ultra-reliable and relatively easy to make. I’m happy to report that the results were beyond my expectations.

I started with Ree’s nearly magical, works-every-time crust recipe, although I leave out four tablespoons of the shortening and swap in the same amount of butter instead. I just like the idea of getting some butter in there! I’ve used the crust recipe before for pie, and it truly is amazing.

Here’s how it went:

Cutting the shortening

Cutting shortening into flour can actually be pretty relaxing.

Ready to mix

Once the crust is done, and the bacon and onions are prepped, putting together the filling is pretty simple.

Into the oven

Into the oven! I used a ceramic tart dish rather than the deep-dish pan with removable bottom that Ree calls for.

Baked just right

A mixed green salad with Balsamic vinaigrette dressing makes the meal complete.

Paired with side salad

And, voilà! I’m happy to report that this delicious quiche completely satisfied my nostalgic craving. I can’t wait to make it again, and, happily, that crust recipe makes enough for two crusts, offering a nice head start. Oh, and the verdict from our kids? Our 16-year-old wouldn’t try it, because she made “the perfect quiche” in a cooking camp a few years back and doesn’t think anything will ever live up to that (so the cycle begins again). Our 14-year-old, a big fan of bacon, loved it, and she didn’t even balk when we served it up as leftovers the next day. I’ll take that!

Cowboy Quiche

Prep Time: 30 Minutes

Cook Time: 1 Hour

Difficulty: Easy

Servings: 10

Ingredients

  • 1 whole Unbaked Pie Crust (enough For A Deep Dish Pan)
  • 2 whole Yellow Onions, Sliced
  • 2 Tablespoons Butter
  • 8 slices Bacon
  • 8 whole Large Eggs
  • 1-1/2 cup Heavy Cream Or Half-and-Half
  • Salt And Pepper, to taste
  • 2 cups Grated Sharp Cheddar Cheese

Preparation Instructions

Fry the onions in the butter in a large skillet over medium-low heat for at least 15 to 20 minutes (maybe longer), stirring occasionally, until the onions are deep golden brown. Set aside to cool.

Fry the bacon until chewy. Chop into large bite-sized pieces and set aside to cool.

Preheat the oven to 400 degrees. Roll out the pie crust and press it into a large fluted deep tart pan (or a deep dish pie pan).

Whip the eggs, cream, salt and pepper in a large bowl, then mix in the onions, bacon, and cheese. Pour the mixture into the pie crust.

Place the pan on a rimmed baking sheet, cover lightly with aluminum foil, and bake it for about 40 to 45 minutes. Remove the foil and continue baking for 10 to 15 minutes, or until the quiche is set and the crust is golden brown. (The quiche will still seem slightly loose, but will continue to set once remove from the oven.)

Remove from the oven and allow to sit for 10 to 15 minutes. If using a tart pan, remove the quiche from the pan, cut into slices with a sharp serrated knife, and serve!

Sylvia’s Perfect Pie Crust

Prep Time: 45 Minutes

Difficulty: Easy


Ingredients

  • 1-1/2 cup Crisco (vegetable Shortening)
  • 3 cups All-purpose Flour
  • 1 whole Egg
  • 5 Tablespoons Cold Water
  • 1 Tablespoon White Vinegar
  • 1 teaspoon Salt

Preparation Instructions

In a large bowl, with a pastry cutter, gradually work the Crisco into the flour for about 3 or 4 minutes until it resembles a coarse meal. In a small bowl, beat an egg with a fork and then pour it into the flour/shortening mixture. Add 5 tablespoons of cold water, 1 tablespoon of white vinegar and 1 teaspoon of salt. Stir together gently until all of the ingredients are incorporated.

Separate the dough into thirds. ***Note: Separating it into thirds will result in three thin crusts. If you prefer a more substantial crust, separate it in half.*** Form 3 evenly sized balls of dough and place each dough into a large Ziploc bag. Using a rolling pin, slightly flatten each ball of dough (about ½ inch thick) to make rolling easier later. Seal the bags and place them in the freezer until you need them. (If you will be using it immediately it’s still a good idea to put in the freezer for about 15 to 20 minutes to chill.)

When you are ready to use the dough to make a crust, remove from the freezer and allow to thaw for 15 minutes. On a floured surface roll the dough, starting at the center and working your way out. (Sprinkle some flour over top of the dough if it’s a bit too moist.) If the dough is sticking to the counter top use a metal spatula and carefully scrape it up and flip it over and continue rolling until it’s about ½ inch larger in diameter than your pie pan.

With a spatula, lift the dough carefully from the surface of the counter into the pie pan. Gently press the dough against the corner of the pan. Go around the pie pan pinching and tucking the dough to make a clean edge.

Enjoy!

Your Foodie Friend Shawn


Yes, a Grilled Salad! Grilled Chopped Salad with Home-Style Ranch

$
0
0

Hello, foodies…

What a WONDERFUL time we had with the folks who came to the In the Kitchen with David Weekend. I’d like to give a great big shout out to the QVC Studio Tour team who organized it, the ITKWD team members who came, and most importantly, the foodies who traveled from far and wide to be there…we couldn’t do this show without your support and we love meeting and hearing from you.

David's the Cliff-Hanger!

On the Way to Chima

New Friends at Chima


ITKWD Live!

Mary with the Foodies

Barbecue Month continues this Wednesday onIn the Kitchen with David. And our next recipe is just terrific…light, refreshing and yes, grilled!

Grilled Chopped Salad with Home-Style Ranch
Serves 6–8

This recipe is prepared with the Mad Hungry 4-Piece Air Blade Knife Set with Sheaths (K41889).

Go to David's Recipe Item Page for the full list of items that David has used in his recipes.

Ingredients:

Dressing:

  • 1/2 cup buttermilk
  • 1/2 cup reduced-fat mayonnaise
  • 1/2 cup Greek yogurt
  • 1 tsp minced garlic
  • 1 tsp minced shallots
  • 2 Tbsp chopped parsley
  • 2 Tbsp chopped chives
  • 1/2 tsp kosher salt
  • 1/4 tsp black pepper
  • 1-1/2 Tbsp red wine vinegar
  • 1 tsp sugar
  • 3/4 cup crumbled feta cheese

Salad:

  • Oil, for brushing
  • Salt and pepper, for seasoning
  • 3 romaine hearts, halved lengthwise, core intact
  • 1 zucchini, ends removed and halved lengthwise
  • 1 yellow squash, ends removed and halved lengthwise
  • 1 red pepper, quartered, seeds and ribs removed
  • 1 yellow pepper, quartered, seeds and ribs removed
  • 1 sweet or Vidalia onion, cut into 1/2" rings
  • 3 ears corn, shucked and cleaned
  • 1 pint cherry tomatoes, halved

Preparation:

  1. To prepare the dressing, combine the buttermilk, mayonnaise, yogurt, garlic, shallots, parsley, chives, salt, pepper, vinegar, and sugar in a small bowl. Fold in the feta cheese and refrigerate until ready to serve.
  2. To prepare the salad, preheat the grill to medium-high. Lightly brush the cut side of the romaine hearts with oil and then season with salt and pepper. Place the lettuce, cut side down, on the grill and cook until grill marks appear, about 30–45 seconds. Remove immediately and set aside.
  3. Brush the zucchini, squash, peppers, onion, and corn with oil and season with salt and pepper. Place the vegetables on the grill and cook until there are nice grill marks on each side and they're tender, about 4–5 minutes for the zucchini and squash; about 8–10 minutes for the peppers, onion, and corn.
  4. Remove the core from the romaine and chop it into 1" pieces. Place the lettuce in a large bowl with the halved tomatoes. When the corn is cool enough to handle, remove the kernels with a knife. (Stand the cob up on the thicker end and run the blade down the sides.) Add the corn to the bowl with the lettuce and tomatoes. Chop the rest of the vegetables into 1" pieces and place them in the bowl. Gently toss, and if desired, mix in the dressing before serving.

Grilled Chopped Salad with Home-Style Ranch

I’ll leave you with this blog question today, foodies...what are your favorite summer salads?Caprese salad? Watermelon and Feta?Classic potato salad? I’ll see you Wednesday night at 8pm ET.

Keep it flavorful!
—David

The Church

$
0
0

I just received a few more wedding pictures, so I thought I would share them with you. Sure hope you don't mind.

Counting our blessings,

Mary Beth Roe


PM Style Blog - Puerto Rico Style 5-21-15

$
0
0

Hi PM Style Pals. If you follow me on FB or Instagram, you are surely bored by now with all of my Puerto Rico pictures and videos. Still I thought for those of you who missed some of the pics and fun, this would be a good place to share our 4 days in Paradise. (Also, since I’m struggling to reintegrate into home life and can’t stop thinking in Spanish and moving in beach time, it seems fitting this would be the theme of my first PMS blog since coming back)

Here’s my Top Ten List of pictures and moments…

1. Room With A View - This is how our trip began, opening the door to our room and gasping at the view. (I don’t mind admitting that I am secretly bitter some people get to wake up to this everyday. At least I’m honest. :)


2. Our first night there, we had sushi while sinking our toes into the sand and admiring the sunset...


3. This is my favorite picture from the trip, Joe took it on a whim when we stopped during a bike ride to check out the view over the ocean cliffs…


4. We celebrated our 2nd wedding anniversary on this trip…


5. One of the most incredible parts of the trip, was the spa. I got a Treehouse massage, they also offered something called a Hammock massage. The Spa was the most beautiful thing I have seen, truly a religious experience, beginning with a tree outside that looks like it could have been planted in the Garden of Eden.

6. Possibly my second favorite photo from the trip was something so simple, sandy feet. (PS: what you can’t see is me sipping the most incredible, gloriously authentic Pina Colada. Real Pina Coladas should be white, not yellow, and they smell like a coconut vacation.)

 7. Don’t laugh, but I became obsessed with bathrooms on this trip. In Puerto Rico they are tropical retreats that invite the outside, in.


8. Catedral De San Juan is the second oldest cathedral in the Americas. During an excursion into Old San Juan we ambled inside and I somehow always gravitate to the prayer candles. They are so powerful and beautiful.


 9. Each day it was a real tug o war between, “should we do beach, or pool?” (PS which are you, bc I think I’m more the pool type) I decided to include my knee in this photo so no one could claim I stole this picture off line after googling “perfect pools in paradise”

10. Last night, last toast, what a trip. We are already planning our return. Muchisimas Gracias, Puerto Rico! Te Quiero!


I hope you enjoyed the virtual trip to Puerto Rico! Join me Monday Nights for PM Style and if you missed anything so far, check it out here and follow me on Instagram here!

Mwah!

Shawn

:) 


My Letter to Kelsey on Graduation Day

$
0
0

“Ladies and gentleman, I present to you, the Messiah College graduating class of 2015!”  As I heard those words this past Saturday, my mind went back to the day you were born 23 years ago.  Kelsey Brynn Wheeler weighed 6 lbs., 13 ounces and our family was complete.

You were always so cute but so incredibly shy.  I remember picking you up from pre-school when you were just four years old and I found you playing all alone in the sandbox away from the other kids.   I always hoped you would make good friends and you did but your shy nature made it difficult.  I’ll never forget coming to your school to watch you give a presentation to your class in second grade.  Mommy and I watched as  you stood and stared in silence at your classmates and  teacher. We prayed that God would help you to say something…anything.  After a very long period of silence said a couple of sentences and  ran to your seat.  It was so hard for you.  Nothing came easy.

After holding you back for an extra year of kindergarten it became apparent that you had learning difficulties so we had you tested and discovered you had a learning challenge with short term memory loss.  This made test taking and assignments extremely difficult. But you kept trying and after years of tutors and extra help you graduated from high school. 

As you faced the prospect of college we all wondered how you would do.  But I’ll never forget the day when you and I were visiting Messiah College where your older sister graduated from three years earlier.  We came out of the library and you looked at me and said, “Dad, if Kirstyn can make it here then so can I!”  I knew in that moment you could do it.

The first two years were a challenge but even though you could have received extra time on assignments and tests  you didn’t want it.  Mom and I watched as you became amazingly organized; worked harder than anyone I have ever known; found your calling and began to soar.  You even traveled to Thailand during your junior year to spend a semester working with kids whose lives had been torn apart by the horrors of sex trafficking.

As I sat down and opened the Messiah College Commencement Program I saw the heading that read Graduation Honors.  My eyes scanned down to Cum Laude, academic honors, and there was your name.  Kelsey Brynn Wheeler……  My eyes filled with tears and my mind flooded with so many memories.  Then, I heard your name being called and I looked up and saw a confident, determined woman walk across the stage and receive her diploma from the President of the College…..and the tears streamed down my face as they are now as I write this.

I have never beamed with more pride and I have never been more grateful.  I am so proud of the way you never gave up and overcame every obstacle.  You not only graduated Cum Laude but were accepted into the Advanced Master’s Degree program at a major university.   But I am grateful for the person you have become and that is what makes me the most proud.  You have always had a heart to help those in need and even volunteered throughout your high school years at a local community center in an impoverished area.  You were faithful and went there every week to help kids with their homework and teach them Bible stories.  You did it all out of love and you have taught me that Love Does…..

You majored in Social Work because you want to help people achieve their best life.  That is no surprise to your family because that is who you are.  You have constantly inspired and encouraged us all to give more of our money, time and talents to help those who are hurting in this world.   You love God with all your heart and you are dedicating your life to serving Him and helping others.

Congratulations Kelsey!  I am so proud to say that I am your Dad and I can’t wait to see all of the great things that God is going to do through your life. 

Love,

Daddy


Happy Memorial Day! Let America's Colors Fly!

$
0
0

Hi, everyone!

I might have a mild obsession with wreaths. They’re such an easy way to decorate your home for any season…and they can be so much fun to make. Just buy the base, pick your décor, grab the glue gun, and GO! I hadn’t intended to make a (well, another) summer wreath, but I was at the craft store recently and saw some clothespins. Then I saw the Memorial Day decorative display. Then, you can probably figure out what happened next…

Patriotic Clothespin Wreath

That’s right. I was in the car with red, white, and blue spray paint, the wreath base, and clothespins before my logical pistons started firing. And when I got home, I made that patriotic wreath.

Here’s what I did, start-to-finish:

What You Need:

  • 12” wire wreath
  • Red, white, and blue spray paint
  • Clothespins
  • Cardstock
  • Starpunch
  • Hot glue gun

And to Assemble:

  1. Spray paint the wire wreath with white spray paint to hide the metal frame.
  2. On old newspapers or a drop cloth, line up all of the clothespins. Spray paint them red, white, and blue. (I did an equal amount in each color.)  Let them dry for 1 hour.
  3. Meanwhile, punch several stars out of the card stock. If you didn’t use white card stock, just spray paint the stars white and let them dry.
  4. Clip the clothespins onto the wire wreath, alternating them between the second and third rings. I started with the red clothes pins, then did the white, and finished with the blue.
  5. Hot glue the stars over the blue clothespins.

Now, mid-creation I realized how fun it would be to make a multi-color wreath for summertime and asked Kathy, who helps us with our You’re Home with Jill crafts, to give it a go. She did a terrific job!

Colorful Clothespin Wreath

Did you all see pictures from my family vacation to Indiana? I shared some photos on Facebook, but wanted to do it here as well, in case you’re not on that platform…yet!

Chocolates!

This is how besties welcome besties to their home...not 1, not 2 but 3 chocolate bars on my pillow. What sweet dreams I had that night thanks to my wonderful friend, Jen. Happy Hoosier Homecoming!

Purdue University Fountain

Just had to stop by the Purdue University fountain and show it off to Kylie...glad to see the tradition of running through continues!

Jill's First Job!

Had to take a pic with this WLFI, News 18 car. My first paid job in television was working for this station in West Lafayette, Indiana. Lots of fun memories!

Jill's Grandpa

My handsome Grandpa...97 years old and dressed up for his high school reunion!! I adore this man. He is a star.

Sunrise in Indiana

Sunrise at the farm...headed home with hearts filled.

From my home to yours,
—Jill

Why I love Disney!

$
0
0

I guess it was meant to be. My Mom used to tell me when she left for the hospital the night I was born,  the Wonderful World of Disney was playing on TV.  So  from my first day on earth I was tied to Disney!  When I was little I loved watching reruns of the Mickey Mouse Club.  I wanted a pair of the ears like nobody's business.  My Dad tried to find the ears for me. He called Disneyland in California; he tried the local TV stations carrying the show; he tried everything but never could find those ears.

Then, when I was 9 years old, Disney World opened.  I couldn't imagine how wonderful it would be to go there! But we didn't have the means to get on a plane and go to Florida, so I just read everything I could about this magical place.  My best friend Susie drove to Orlando with her family, and came back with amazing stories of a roller coaster in the dark (Space Mountain) and rides and experiences that I just couldn't imagine.  A few years later my Aunt Frances visited the park, and told me about a ghost who sits next to you in the Haunted Mansion. Wow!

Finally, when I was 36, I was planning my first trip to Disney World. To say it was worth the wait is the biggest understatement I could make.  Cara was two years old and I loved seeing the magic through her eyes.  When we got home we played all the videos for my Dad.  When I kept saying, "Look at Cara!" he kept saying, "But look at you!" I was tearing up at every moment.

A few years later, when Deirdre made her appearance, we went to Disneyland. There was something so special about walking in Walt Disney's footsteps.  We were shopping in Downtown Disney, and Cara (who knew about my Mickey Ears story) spotted a pair of Mickey Mouse Club ears. Of course I had to buy them and thought about how happy my Dad would be!

And now, as the girls are get older, we still love every minute of our trips to Disney. I never take the good fortune for granted to be able to share this love with my family. Our happiest days are at the happiest place on earth, and know that will never change!   


How My Garden Grows

$
0
0

I absolutely love to garden! I enjoy being in nature, and being outside nurturing it is really fulfilling for me. My dad always grew carrots, peppers, tomatoes, and more when we were kids. He and my mom helped me plant gardens when Nikki was young too. My mom and dad's families always grew their own food on farms, especially potatoes...I suppose I have it in my blood!

My goal each year is to try something different. I do not have a large garden but I always have fun using pots, boxes, and garden bags to give me options for growing different things…I took some pictures to share with you all. Let me know what you think!

I love my catmint around my mailbox because it does not need any care during the season and returns every year.

I thought I would try chocolate mint this year—any suggestions on what to use it for?


I have a goji plant from the Roberta's boys. I am hoping to grow it in a pot for using on salads.

My lime tree is an ornamental lime tree. It's three years old and in bloom now…I love it!

My grapes are very sour but only a few years old...not ready for wine, unfortunately!

I separated my pumpkin this year in hopes that it has lots of room to grow—any suggestions on how to keep my squirrel from eating it?

I hope I get to the salad greens before the rabbits, too…

Since I come from a family of potato farmers, I decided to try fingerling potatoes. I already have some sprouts!

I am trying to grow some crooked neck squash…for fall decorating of course!

My favorite front porch plant is a fuchsia because I love the two-tone flowers...every year the birds bless me with a nest in them!

My pots are being protected by a pinwheel since the squirrels are pulling out my flowers!

My tomatoes are heirloom from Roberta's...I planted marigolds and garlic with them to try to keep my groundhog from getting to them before me.

I planted butterfly bushes in memory of my dog, Misty. When she was a puppy, for several years straight she ate the entire plant. It must have been sweet to her!

I have a spot in my front yard that is barren as I removed fallen trees after Superstorm Sandy. Any ideas on what to put in a memorial garden for Misty there?

Misty loved gardening with me and I have to admit that I had a heavy heart without her by my side…

Please share your garden ideas, tips and pictures with me...keep me posted too!

And tune in Friday 5/22 at 10pm ET to keep me and Jayne company during Fashionably Late. Check out my Facebook page to see the Mid-Week Sneak Peek (#MWSP), and be sure to like my page to get updates on all my adventures all week long.

Happy gardening!

Pat

You can find me on Facebook at: www.facebook.com/PatJamesDeMentriQVC

Twitter: www.twitter.com/pdementri

Instagram: www.instagram.com/PatJamesDeMentriQVC

Chelsea’s Graduation

$
0
0

I cannot begin to express the overwhelming joy we experienced watching Chelsea receive her college degree. It was a feeling of pride, relief, joy, gratitude, and of course a lot of anticipation about what the future holds for her.

We’ve been so blessed to be able to give our daughters the opportunity to attend college, something that many people might not be able to do for their children. We felt it’s so important to stress to both Lauren and Chelsea how fortunate we have been and they know to work hard in all they do on behalf of those who may never have this a chance to go to college.

Chelsea was a four-year scholar athlete on the women’s basketball team and graduated cum laude with a BA in business administration. The Multicultural Coalition that she served on awarded her the beautiful sash she wore. 

In the summer before her freshman year of college, James and I talked to Chelsea about her hopes, dreams, and goals for the future. Although, like many freshman entering college, she wasn’t sure what her calling was just yet, she clearly understood that she was embarking on the next chapter in her journey and was committed to making her college experience one that she would cherish her entire life. If I had any advice for parents who are about to start this journey with their children, it would be to let them go, let them grow, be there when they fall, hold them accountable, and love them always because they are the future. 

Good luck to all the 2015 graduates. Congratulations to the parents, grandparents, family, and friends who supported them…it certainly takes a village! God bless and God speed.

In the midst of all the celebrating (and preparing for the long holiday weekend!), we hope you’ll join Pat and I for Fashionably Late this Friday, May 22 at 10pm ET. As always, be sure to check out my Facebook page for our Mid-Week Sneak Peek (#MWSP) item, and if you haven’t already, like my page to get fresh updates each week. And keep checking Facebook for some inside scoop, style inspiration, and lots more fun!

Blessings,

Jayne

You can find me on Facebook at: www.facebook.com/JayneBrownQVC

Twitter: www.twitter.com/jaynebrown1

Instagram: www.instagram.com/jaynebrownqvc


White Chicken & Mushroom Enchiladas

$
0
0

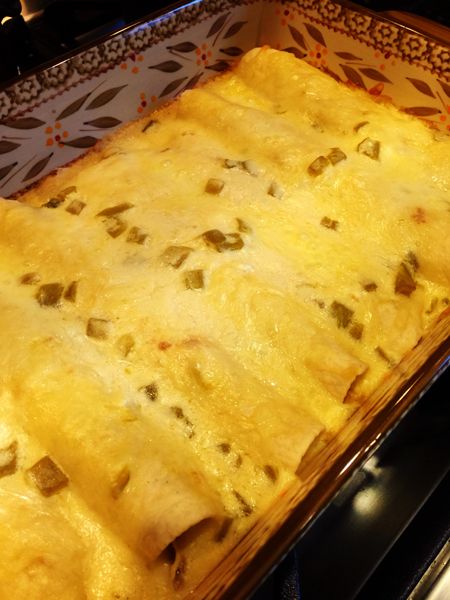
We changed up yesterday's Taco Tuesday with this quick & easy Enchilada recipe.  I used a rotisserie chicken that I got from the grocery store last night but I think this would be even better with marinated chicken breast.  I will let you know next time I make it.  Enjoy!


White Chicken & Mushroom Enchiladas

Ingredients:

10 soft taco shells (I used flour)
2 cups cooked, shredded chicken (in a hurry? use a store bought rotisserie)
2 cups chopped mushrooms
2 cups shredded Monterey Jack cheese
3 Tbsp. butter
1 tsp Olive oil
3 Tbsp. flour
2 cups chicken broth
1 cup sour cream
1 (4 oz) can diced green chillies

Instructions:
Preheat oven to 350 degrees. Grease a 9×13 pan. Saute onions & mushrooms, set aside. In a sauce pan, melt butter, stir in flour and cook 1 minute. Add broth and whisk until smooth. Heat over medium heat until thick and bubbly. Stir in sour cream, chilies, onions & mushrooms. Do not bring to boil, you don’t want curdled sour cream. Mix chicken and 1 cup cheese. Roll up in tortillas and place in pan. Pour sauce over enchiladas and top with remaining cheese. Bake 22 min and then under high broil for 3 min to brown the cheese.

Tips and Suggestions: * Add a cup of salsa to the chicken mixture

You can find me on Facebook at: www.facebook.com/JayneBrownQVC

Twitter: www.twitter.com/jaynebrown1

Instagram: www.instagram.com/jaynebrownqvc

Everyday Essentials

$
0
0

Hello everyone.  I’m so excited to celebrate the launch of my static show with you!  For those of you that don’t know, a static show means that I’ll be on-air weekly at a regular time, so, starting May 22, you can tune in every Friday at 11am.  (Our first show is a special two-hour program, so it starts at 10am).  Each week, the show and my new pieces will be centered on a theme and this week is dedicated to Everyday Essentials.  Over time, these well-loved pieces will become part of your daily routine, the foundation pieces that you layer with the rest of your collection.


My own personal Everyday Essentials are based on my own daily routines – and I’m a firm believer in consistency.  When I am in Palm Beach, I often walk in the early morning with my friends before the hot south Florida sun gets the best of us.  We either walk along the shaded sidewalk of South County Road or along the path next to the intercostal near my home.  I am fortunate to be surrounded by so much beauty on the island.  Oftentimes, when I’m on a walk with friends, my eyes light up and my friends will ask me what I’ve seen since they know I’ve alighted on the inspiration for one of my next designs. 


I spend at least a few hours each morning on the phone with Beth discussing designs, and I sketch three days per week in the mornings no matter what.


A light breakfast after my morning walk

My afternoon routine varies depending on whether I’m in Palm Beach or New York.  While in Palm Beach, I visit the Norton Museum for every show – I am an avid supporter of the arts.  Regularly immersing myself in the arts and in fashion helps me to conceive of many of my best ideas.  I am always flipping through dozens of fashion magazines to help me stay current; the international ones are some of my favorites.


For me, inspiration doesn’t just come from museums, nature and fashion; it also comes from my friends and the activities and events that I attend.  I’ve learned how to play Canasta, and I frequently play amongst a group of 200 women at Trump International Golf Club where we pair up and enjoy the game and a light lunch and sometimes something sweet for dessert.  I almost think of it as a laboratory to see what my friends are wearing and also to notice how they react to the pieces that I’ve picked out for the occasion.  I know that if they ooh and aah, I have a winner!


The jewelry I wear everyday is just as important to me as my exercise routine and my other regular activities.  It makes me feel confident, put-together, and ready to take on whatever the day throws my way.  Most people lay their outfit out the night before and then add jewelry.  I do the opposite – I lay out my jewelry first and then decide which clothes will best accessorize the jewelry. 

I always start with a hard cuff and then, find the right soft link bracelet to pair it with.  On my other wrist, I like to wear a watch and another coordinating soft link bracelet. I’m very attached to the QVC watches!  Depending on the outfit, I will sometimes add drop earrings or a necklace. 


I just told you all about my Everyday Essentials, and now I get to show you new pieces that will become a part of your everyday routine. I’m excited about my new Stainless Steel Lexington Watch.  I chose Lexington as the name for this watch because when I was sketching I was inspired by the sophistication of Manhattan.  This watch has a timeless silhouette and it’s an “all the time” piece.  I haven’t done a two-tone watch in years, so this one really is special.  

I’ve also designed a collar necklace that will quickly become one of your new favorites.  This collar style is very of-the-moment, and you can wear the necklace on its own without any enhancers.  I’ve also designed different enhancers so that you can further tailor this piece to your personal taste I love the movement of these, the way the colors shine, and how the doublets glow.    

My Diamonique Pave enhancer is perfect for an elegant look.   I’ve added texture to create a modern and sophisticated look.  

Another trend that I love is an open-work ring.  The open space makes these rings especially flattering on any finger.  My Sterling Cross-over Band ring will easily become one of your favorites because it’s versatile.  The best part about rings like this is that even though they are very on trend, they will never go out of style and they can easily compliment the pieces in your current jewelry collection.  


Which pieces of your jewelry have become a part of your daily routine? Fill me in by posting to my Facebook page or in the comments below.  I can’t wait to see you soon — don’t miss my big debut on May 22nd from 10am – 12pm!

Clickhere to shop all Judith Ripka

With love, Judith


A Day at the Races!

$
0
0

One of my favorite things about the warmer weather months are all of the events that surround them and the places they are held.  Beach weddings, outdoor BBQ’s, family reunions in park settings – no matter which way you go, Mother Nature has set a perfect backdrop for all of our gatherings.  I love entertaining outdoors and that’s why I was so excited to help host a tent party at the Radnor Hunt Races this year!  This event brings thousands of people together to raise money for various charities, and in the process, you get to dress up, watch the races and enjoy good food and great company! So I grabbed my Canon Powershot and headed to the races!!

Because this is an outdoor event with no access to electricity or running water, I created a menu of items that I could pre-cook and serve at room temperature. Below are some of my favorites from the day!!

As a main dish, I brought a Smithfield Ham, because they always hold up well at room temperature and can be turned into sandwiches or eaten as a main protein on a plate. 

I personally love this Israeli Couscous dish.  It’s really simple to make and is delicious.  Cook a packet of Israeli Couscous (no brand in particular), and mix in 1 cup of roasted cherry tomatoes, ½ cup of kalamata olives, pitted and chopped, ¼ cup mint, thyme, salt, pepper and lemon juice – and voila!  (I crumbled Feta on top for garnish and adds to the flavor)

For dessert, I had a friend bring many of the “little bites” and I brought the centerpiece – a Sweet Endings Coconut Bomb! It was definitely a SHOW STOPPER for my tent and for the neighboring tents! People stopped by to ask about it…and have a slice!! There was so much to go around, and It was the perfect summertime dessert.  Light and fluffy and ohhhhh so yummy!!

These white chocolate covered pecans from Squirrel Nuts also held up well in the heat! Talk about “melt in your mouth, not in your hand!”

It was a fabulous day and I was so glad to be a part of it!!

What are some of your favorite dishes to eat outdoors? Leave comments below or visit my Facebook page and let me know there!

XOXO

Alberti

FACEBOOK

INSTAGRAM


May is Gold Month

$
0
0

1. What trends are you loving in fashion right now? How does Gold work with those trends?

The resurgence of women wearing dresses again, whether they are knee length or maxi, leads right into gold necklaces against either solid colors or prints. It’s the perfect way to add the sparkle and shine!


2. Reinventing classics. What is your favorite new gold trend or way to wear gold?

For years I tended to wear all my gold necklaces at lengths like 16”, 18” or 20”. Now I’m only buying the longer ones like 30”-36”. I’d rather spend more and own fewer pieces, but own longer, bolder pieces.


3. Do you have a go-to or signature gold look?

It’s definitely gold hoop earrings. I prefer the hoops that are 1-1.5” in diameter but with a substantial width. It’s more important to me that they are bold rather than big.


4. Do you remember the first gold piece you purchased, and why you purchased it?

It was 27 years ago, and it was a bold stampato bracelet where every other large link alternated between 14k yellow gold and 14k rose gold. It’s still beautiful to this day! In fact, they are difficult to find anymore.


5. There are so many ways to personalize jewelry, how do you "personalize" your gold jewelry?

 I do like initial pendants, but if I can add a pop of color, I like to add my August birthstone, the peridot, as well as my husband’s birthstone, February’s amethyst.


6. Are there essential gold pieces every woman should own?

I believe the essentials include gold hoop earrings, an 18” necklace bold enough to be notices but also able to be worn with pendants. I think she should also have a gold bangle bracelet and a good right hand ring. 


7. How do you decide when to purchase fashion jewelry and when to purchase a fine jewelry piece?

If a design is classic, timeless and elegant, I prefer to buy it in fine jewelry. If it is more of a fad that will change by next year, then I buy the fashion jewelry, so when the trend is over, you still got your money’s worth.


8. Why do you love gold?

I love Karat gold because of its warmth and beauty! However, I’m also practical so if I’m going to pay more for it, I want it to last a long time. And it’s really all about the way it makes me feel—like a princess!!


Our Satchel joins in on the celebration!

$
0
0

This past week, my family went to Montana & Wyoming to celebrate a very special birthday to celebrate my dad. It was the first trip (in as long as I can remember) that the whole family was able to travel together. From Mount Rushmore to Yellowstone to Jackson Hole, “Today’s Special Value” joined in on the festivities!


Are you familiar with the childhood project “Flat Stanley?” If you are not, it is an assignment for kids where they take a piece of paper (named and shaped like Stanley—see below) and they take him on an adventure.


This Satchel-Journey is exactly like that… it came with us on our unforgettable family trip!


1) Our first stop on our amazing vacation was to Mount Rushmore & Crazy Horse… places my father has always wanted to visit.


2) Next up, we jumped in our car and left for Yellowstone. We stayed in tiny cabins (no TV, no WiFi…just the basics.) We were on the search for animals & the most beautiful hot Springs. We encountered breathtaking sights. Bison were at our doors, on the street as we drove around, and just hanging out on our walk to breakfast! Every morning my dad and I would get up early (mama slept) and visit a different Hot Spring. The turquoise pool took our breath away.  

3) Old Faithful, in Yellowstone, was our next stop. If you are not familiar, it is one of the most predictable geographic features on Earth, erupting almost every 63 minutes!

P.S.- I won in our nightly game of Scrabble.


4) After living with nothing but the basics for the week (which was actually refreshing), we headed to Jackson Hole for some more sightseeing, hiking and needed R & R (with my bag of course!) 


This was my favorite part of the trip as we got to see what 99% of the visitors don’t get to see…A grizzly bear right outside our car window! We hit the jackpot. But that wasn’t all, we spotted a beaver, an eagle, elk & endless postcard-like settings.


I am extremely grateful for the time with my family & the opportunity to celebrate my Dad’s Birthday. Glad our newest beauty got to join me…I look forward to hearing how your new bag joins you in creating many memories for a lifetime.

XO

Jill

P.S.- Thank you to the amazing G.I.L.I handbag team for the Q’s newest baby…. it is a piece that will stay in your closet forever!


The Best Chicken You'll Ever Eat!

$
0
0

This recipe I got when I started eating Paleo - If you like Indian flavors its a must but if you never tried, I can assure you its so good, my fussy young boys love it!

Brining Ingredients:
8 cups water
3 tablespoons salt
2 garlic cloves, whole
1/2 tablespoon soy sauce or coconut aminos for paleo style
1 bay leaf
1 teaspoon whole coriander seeds
1 teaspoon whole cumin seeds
1 teaspoon whole black peppercorns
2-3 pounds boneless, skinless chicken breasts and/or thighs

Brining Directions:
1. Put water in a large ziplock bag and add the salt, garlic, soy sauce or coconut aminos, bay leaf, coriander seeds, cumin seeds, and peppercorns. Let the salt dissolve.

2. Add the chicken breasts to the bag. This will look gross; ignore it.

3. Put the bag in the fridge and forget about it for 2 hours.

4. Remove the bag from the fridge; ignore that it looks even grosser.

5. Rinse the chicken well. Think about something else as you do this so as not to notice that you’re holding raw chicken.

6. Place in a sieve to drain/dry while you move on to Secret #2.

Spice Blend Ingredients:
1 tablespoon ground cumin

1 tablespoon curry powder
1 tablespoon chili powder
1/2 tablespoon ground allspice
1/2 teaspoon ground cinnamon
1 teaspoon ground black pepper

Spice Blend Directions:
1. Combine all ingredients in a small bowl and mix well with a fork. Preheat a gas grill on high heat, with the lid closed, about 10 minutes.

2. Coat the chicken pieces with the mixture; massage and pat it on lovingly. You want the pieces pretty densely coated.


3. Place the chicken smooth side down on the preheated grill, close the lid, and cook for 4 minutes. Flip the chicken, cook for an additional 3-4 minutes with the lid closed, until the chicken is browned and cooked through.

I made asparagus to go with this dish. 

Here is the finished dish!

Enjoy!

xo

Stacey

Recent SPAM posts in the forums

$
0
0

We are very sorry about the disruption of the QVC forums that involved hundreds of posts with inappropriate content displayed across all of our forum categories. These inappropriate posts have been occurring during a time when we are not able to quickly remove and ban the user who is abusing the opportunity to participate.


When we see these inappropriate posts we remove them and ban the user involved. This problem cannot be permanently resolved with the tools we have today. We are actively working on system enhancements that will remove this problem automatically.


Until we complete the enhancements needed to address this problem we will be turning off the ability to post in the forums from 1AM to 7AM ET. During this time you will still be able to read forum and blog posts, just not start a new discussion or post a reply. We are sorry to those members of the Community who this action will negatively impact. It is a temporary fix while we get the enhancements in place to systematically address the problem.


Thank you for your patience while we get this resolved.


Sincerely,

QVC Community Team

Our Day at Sesame Place!

$
0
0

During my time off, we got to take the kiddos to Sesame Place! 

I had just as much fun with the characters as the kids did :) 


Coco's first big girl ride! 


This picture is just TOO funny! 


Jace riding the mary-go-round with daddy's help. 


Let’s Build a Workbench

$
0
0

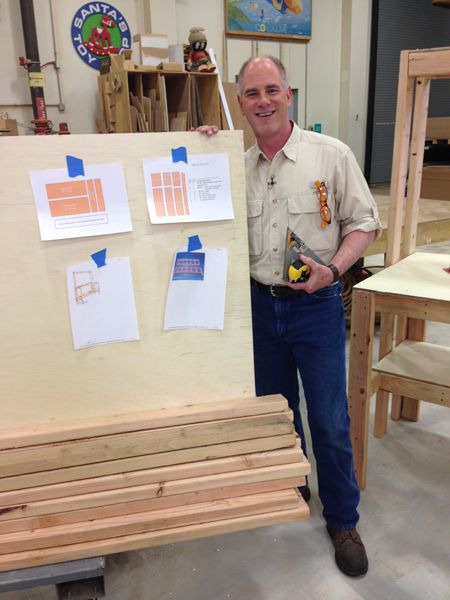
Hello again.   Let's you and I build a workbench together that you can use in your garage or home workshop.  The entire project should cost less than $100 to build and can be accomplished in just a few hours.  It is my latest project in my "Do it Yourself with Dan" series.   Take the time to watch the included video because it will give you a good head start on what we will be working towards. 

Your shopping list is comprised of (15) 8 foot 2x4's......a single sheet of 4'X8' ply wood, (I recommend 1/2 thickness).......some 3 inch decking screws and some 1 and 5/8 inch wood screws. 

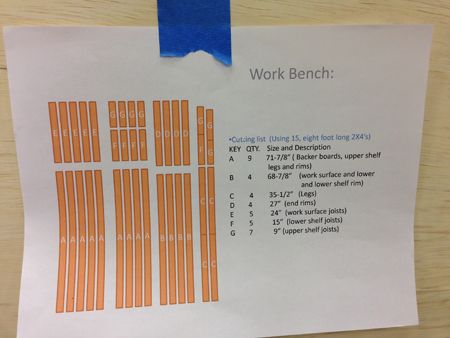
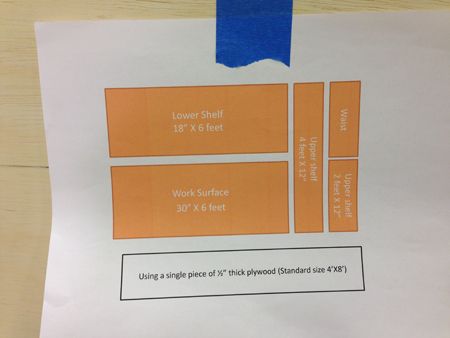
I always start a project by making a cutting list or all lumber and I have included my list for you here.  The list makes it easy to get all your cutting done at one time and speeds up the process.  Remember to measure twice and cut once to minimize any waist. 

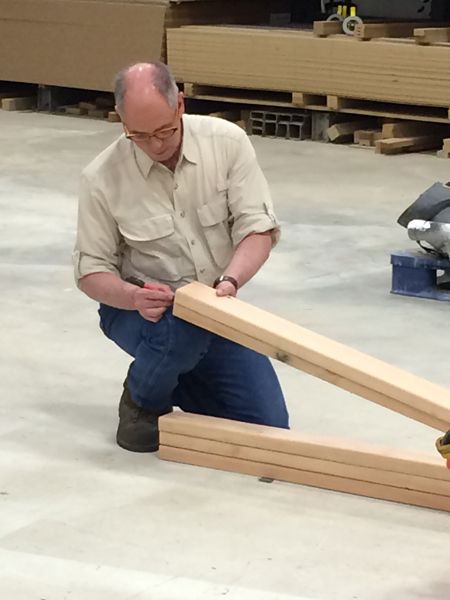
Take the time to label each piece of lumber as you cut it and then we can begin the assembly.

I have marked mine with the corresponding letters A-G that you will find on the "cutting list". 

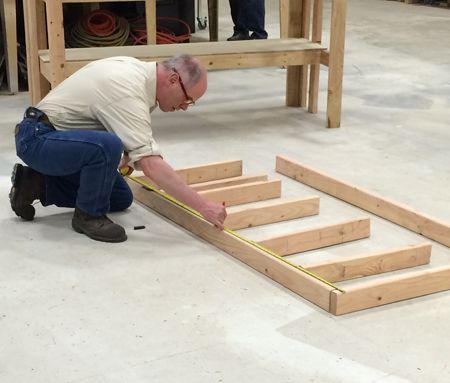
We will start by building the frame work for the bench top.

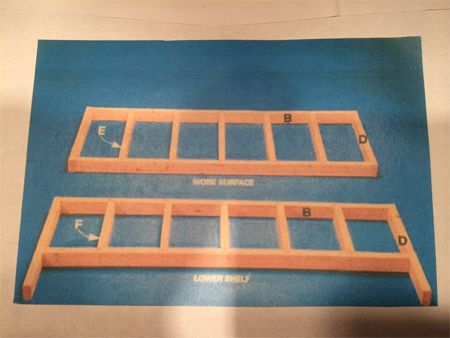
Take the time to square up your work as you use the 3 inch decking screw to create your support frames.  Each framing member on the inside of the frame is measure at one foot increments and measured from the middle of the outer support (D) to the middle of each inner support (E). Ok wow..that sounded really confusing but don't let it bother you...just get it close because it will all be covered by the plywood later. 

Now repeat the process for the lower shelf assembly.  Projects like this should be fun don't let yourself get too worried about perfection like I do, you will only make yourself crazy and take the fun out of it.

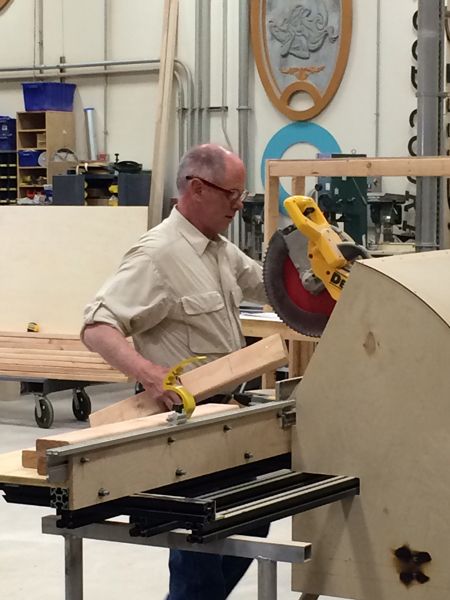
Now let's cut your plywood for the bench top and shelf tops.  A circular saw works well for this part of our project. 

Now attach the legs  (parts lettered "C" on your cut list) ...... and then attach the shelf frame that you just assembled...you get to pick the height from the floor to the bottom of this shelf.

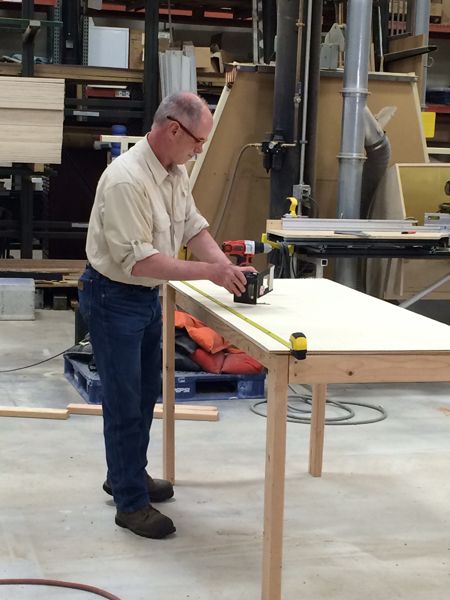
Attach your plywood to the bench top and bottom shelf with 1 5/8" screws and were almost there. 

The rest of project just follows by attaching your side supports (Part A's)..and attaching your top shelf support frame built just like the first two.   Cover it with the last two pieces of plywood and screw in place with additional 1-5/8" wood screws.  If you decide you don't want or need a top shelf than that's ok to it is all up to you.   The remaining lumber is there for additional supports (Parts marked as "A" in the cutting list.)..and they are there for additional support for the back of the work bench to attach peg board for hanging tools.  You may or may not decide to do that and that choice is up to you as well.

It sounds confusing but YES you can build this and it will become the platform for many other rewarding home projects you can build in the future. 

Enjoy the process and feel good that you made it yourself.  More projects to come...the next one is how to frame out that flat screen TV you purchased and make it a part of your home décor...and the next one is really simple to accomplish!

You can find me on Facebook at: www.facebook.com/DanHughesQVC

Twitter: www.twitter.com/danhughesqvc

www.gather.qvc.com/member/DanHughes

The Toy Throwback!

$
0
0

We had ended up taking the kids to the Please Touch Museam last week where I discovered all of these toy throwbacks! Do you remember ever having some of these toys? A few of them I didn't even know existed! I would love to hear your stories!

Did you know about Full House dolls!? I didn't... How funny!

Oh my gosh... Donny & Marie Osmond! 


I never had a Barbie Dream House but my neighbor did! I always wanted one. I did have the camper though!

Good old John Travolta! He even looks good as a doll! Smile

Looking good, Dorothy!


Viewing all 3342 articles
Browse latest View live


Latest Images